A, instrument use
Non contact image measurement instrument is composed of a high resolution CCD color camera, zoom lens, PCcomputer display, switching box, precision optical ruler, 2D data measurement software and high precision worktableprecision mechanical structure of high accuracy, high efficiency photoelectric measuring instrument, with two dimensional measurement, can also be used in 3D measurement. It is widely used in Precision Industries in different kinds, such as electronic components, precision mold, precision tool, spring, screw machining, plastic,rubber, oil seal valve, camera parts, bicycle parts, auto parts, conductive rubber, PCB processing various precision processing industry, machinery, electronics,instruments, clocks and watches, light industry, plastic industry, universities, research institutes and Metrologydepartments measurement room, laboratory, production workshop is one of the indispensable measuring equipment.
Two, the structure and working principle of the instrument
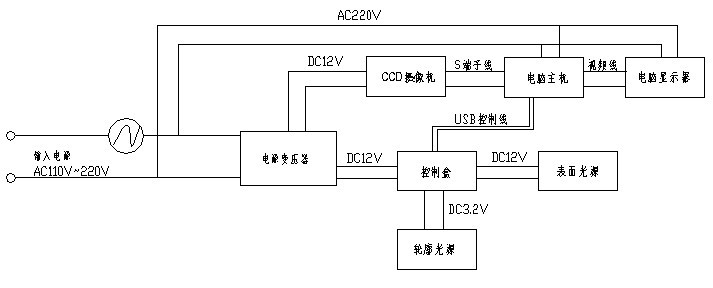
Optical image measurement is one of the sophisticated and efficient advanced measuring methods at present, its working principle is: the measured workpiece (on the table)by the surface finish of LED (07) or contour light (in the base) lighting, the zoom lens (08) color CCD camera shell(11) uptake image, and then through the S terminal is transmitted to the computer and display (10), the softwareon the display of the video crossing line (09) as a benchmark, to aim its measurement, the workbench (05)driven optical ruler (06) and (17) moving in the X, Y direction, a switching card to the computer for dataprocessing, display, complete the measurement work. The working principle of imaging system shown in figure 2.
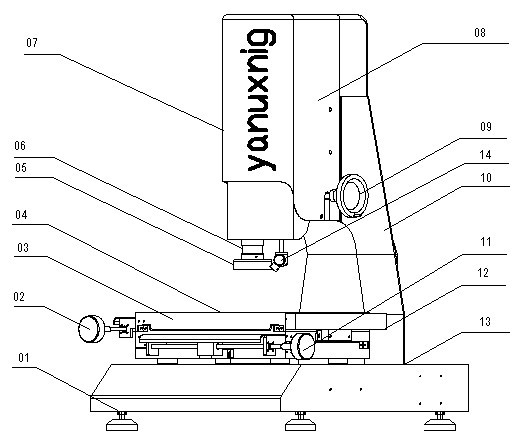
The instrument overall structure can be divided into three parts (Figure 1):
1, instrument structure, including:
Instrument base (02), column (13), a shaft Z transmission(14), X, Y table (05) and X, Y light bar transmission mechanism.
(04, 18).
2, image system (imaging target), including:
Zoom lens (08), a 0.7-4.5X zoom range, total video amplification rate of 34-220X. A color CCD camera on the cover
(11): will zoom lens uptake image into an electronic signal,and then through the S terminal is transmitted to the 17"color
Display (10), have aligned with the edge of the cross line(9) for measuring aiming for.
Contour light source (in the instrument base) / surface light source (07) using LED light source brightness adjustment(control switch is shown in Figure 3), good lighting effect,service life is 10 times longer than traditional light bulbs.
3, the digital measuring system, including:
The X axis (18) the Y axis (04) optical ruler, the geometricdisplacement into a digital signal, the switching card by computer, display of measurement data, the specific operation meet the specification of the software.

Fig. 1 the instrument overall structure diagram
The 01 foot screw 02 Y shaft drive group of 03 bench 04 X axis optical ruler 05 surface light group 06 zoom lens 07color CCD camera cover 08 body 09 column 10 Z drive shaft group 11 Y axis optical ruler 12 axis X group 13 base 14 probe instrument
Three, out of the box and installation of instruments
1, the demolition apparatus outer and inner package,remove the manual instrument, first of all to read this section.
2, the instrument body moved to the positioning table,mounted on the foot screw, with the level of levellinginstrument.
3, remove the X, Y axis, Z axis sliding block fixing platefixed screw (in the camera cover in the sliding block), X, Y,Z axis can drive.
This machine use the power available from AC110V-220V,50-60HZ, connect the monitor, switching instrument power,instrument installation is complete.
The instrument before use, please read carefully theinstructions provided.
4, equipment installation and using the pre inspectionwork, generally by the suppliers to bear.
Four, the instrument measuring method:
Image measurement can be divided into two types: profile measurement, surface measurement.
1, contour measurement:
Contour Gu's name is a measure of the workpiece, theprofile light bottom, when needed can also add surfacelight as auxiliary lighting, let the measured line more clearly, facilitates the measurement.
2, the surface measurement:
Surface measurement can be said to be the main functionof image measurement, who can see the surface pattern size, the surface light source illumination, image measuring instrument almost all of them can measure, for example,the line of copper foil size circuit boards, IC circuit, whenthe object to be measured is black plastic, rubber, image measuring instrument can also easily measured dimensions.
Maintenance and maintenance five, instrument:
Image measuring instrument is a kind of precision measuring instruments and integration of optical, electrical,machine, need to have regular and good maintenance, to maintain the equipment in good used condition, it can keepthe original precision instruments and prolong the life ofthe instrument and.
1, the instrument should be placed in a clean dry room(room temperature 20 ± 5 ℃, humidity below 60%), avoid surface fouling optical parts, metal parts rust, dust anddebris falling into the motion guide, affect the instrumentfunction.
2, equipment after use, the work surface should be clean,the best and then cast dust cover.
The drive mechanism 3, instrument and motion guide,should add the lubricating oil regularly, the movement is smooth, good condition of use.
Table 4, glass and paint surface dirty, can use a neutral detergent wipe clean with clear water, must not be wiped with organic solvent paint surface, otherwise, will make thepaint surface loses luster.
5 instruments LED light source, long service life, but when the bulb burned out, still please notify the manufacturer, by professionals for you to change.
6, the instrument precision parts, such as image system,working table, optical ruler and the Z shaft transmission mechanism are required precision alignment, all adjusting screws and fastening screws are fixed, the customer do notself demolition, if has the question please inform vendors to solve, disassemble the instrument failure or precision degraded, not covered under warranty within the.
7 measurement software, computer, has error on thebench and the optical ruler was accurate compensation, do not make changes, otherwise, will produce the error to measurement results.
8 instruments, all electrical connector, generally do not pull off, as has been pulled out, must according to mark the correct insert and tighten the screws, incorrect insertion, it will affect the function of instrument, it can damage the system.
9, the instrument should be grounded, stand behind thepower supply interface board identification, and the equipment to use, the power socket to have the ground.
Six, complete sets of equipment.
The number of the number of the name name
1, the main body of the instrument 17, fuse 5A 4
2, 18 CCD cameras, manual 1
3, 0.7-4.5X zoom lens 19, products manufactured passcard 1
4, the control box 110, PC computer and display the purchase
5, the measurement software manuals 111, 2X additionallens purchase
Buy 6, power line 112, additional surface cold light source
Due to continuously improve the product of the company,the company reserves the right to change the design andspecifications of the right, without prior notice.


